Monday, December 17, 2012

New Anatomical Jewelry series!

So my Etsy shop Anatomical Element (http://anatomicalelement.etsy.com) has been doing really well!  I've created a few new SMALLER versions of my original pieces and am surprised with how well they turned out!  I am getting much better at sawing fine details - now to improve my bezel setting!

Anyhoo, I just wanted to introduce a new series that I've been developing.  It's called Organ Chatter! It's a series of anatomical pendants featuring organs with specific words - like a liver that says Cheers!  Or a heart that says LOVE.  They will be available in my etsy shop soon!  Right now there's only one of each, but after the holidays I will be back taking orders and creating more!

Check it out! 


I've also played around with creating belt buckles.  This is my very first creation and I will have to end up making my own buckle instead of purchasing one, in order to make it secure.  But, it's a start!  Will hopefully offer more of these on Etsy as well!


And here's a few more fun images because it's Monday and we all need a pick-me-up on Mondays.
 I keep making things smaller!  This weekend I created my largest skull (belt buckle above) and my smallest (quarter size below).  Loving this!


This is available on Etsy right now!  
 

Saturday, October 20, 2012

Jewelry Chronicles: Wax & Casting

Another jewelry edition!  I decided to blog about this process in case I want to revisit it as a resource in the future.  All these notes are in my sketchbook, but it's helpful to pair them with the reference photos I took as well. So, here is my first experience with the lost wax casting process for jewelry!

Soft Wax & Sheet Wax
We were introduced to soft wax and sheet wax.  Extremely pliable.  Use of an alcohol lamp to heat up the tools allows you to add or take away wax to your sculpture, as well as connect pieces of wax together.  There is also soft wax wire that can be twisted or heated up on the ends to create drops or balls on your sculpture.


 Carving Wax
Carving wax is what we used to create our first ring sculptures.  There are 3 types: hard (green), medium (purple) and soft (blue). The soft wax is better for fine detail.  Using a twisted metal saw blade, we cut blanks from a wax ring tube.  Using a gauge and divider, the blank is measured and scribed to mark where your middle and carving spots will be.  It's like making a map for your sculpture.

Finishing
Any textures you have on the wax will appear in the metal.  So sanding and smoothing are important if you want a clean look.  The best thing to use to smooth is old pantyhose or nylons.  They burnish the wax and you are able to see spots that might need more sanding.

Sprue & Weight
A sprue is a channel for the metal to flow into the wax sculpture.  It's created out of wax and attached to the sculpture at an angle to reduce air bubbles.   Once the sprue is attached to your sculpture, you need to weigh your wax to figure out how much metal you need.  Luckily, the calculation is fairly simple.  Weight of wax in grams x 11 (specific gravity of silver) x 1.2 (an extra 20%) = The amount of silver in grams that you need.


Investment
Attach your sprue to the base of the flask with brown wax.  Make a tootsie roll shape and stuff brown wax into base hole.  Create a hole for the sprue in brown wax, then build up with wax and melt together.  Next coat all of the wax with a debubble-izer solution and let it dry completely for about a half hour. 
Mix investment plaster: sift slowly as powder dissolves itself and pour into flask when thick. You have 9 minutes TOTAL to mix and pour.   Put flask on vibrating wheel and tap the sides to eliminate air bubbles.  Let this set for 10 minutes, then scrape off the excess plaster on top.  Remove the bottom slowly and store in a plastic bag.


Casting
When ready to cast, put your flask in an oven or kiln to melt out the wax.  A mold is left by your investment.  Casting is done using a centrifugal or spin casting method.  The spin caster is wound up and held in place with a pin.  Then pre-heat the crucible so it is ready for the metal.  Pour your silver metal into the crucible and heat up until the metal is molten.  The flask is placed in the cradle and with the bottom facing the crucible so the metal will flow into the flask.  Re-heat your metal until molten again.  Drop the pin that is holding the device still, then let go, remove heat and allow it to spin and cool until it stops.


Remove your flask and allow it to cool for about 10 minutes.  Then quench it in water to remove the investment.  Find your metal and clean off the excess investment.


Clean up and Polishing
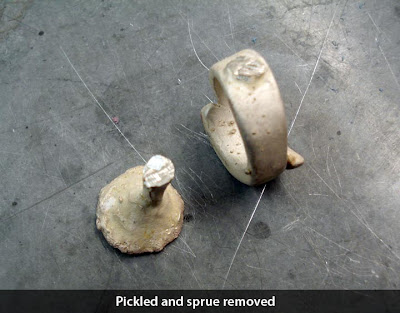
Put your metal in a pickle pot to clean off the dark oxidation.  Then remove your sprue by sawing and begin the sanding and polishing clean up of your piece! 


Tuesday, September 4, 2012

Success & motivation

Hooray!!  http://anatomicalelement.etsy.com is a SUCCESS!!  
I'm very excited that I have sold 3 items already!  This success is just driving my motivation through the roof!! I have been sketching and writing out ideas all day!!

It's fun to package up the pieces and send them off!  Here's a quick photo of my very first sale all ready to go!  I include a handwritten thank-you card in each package, with my business card and care instructions (if necessary).  I might start including care instructions with all of my pieces.

Like the skull ribbon?!   I might reserve this for anatomical pieces only, as it might be too Halloween-y for some folks.


And I have my first commissioned challenge - a skull belt buckle using my skull pendant as a basis!  I ordered a blank belt buckle and I have a bunch of ideas swimming around in my head!  Can't wait for it to arrive so I can start creating!!

I will be listing the remaining items that I have finished this week.  I have some rings that I need to figure out what size they are before I list them.  Need to buy a ring mandrel with sizes.

What do you all think of the store and my pieces?  Anything you'd like to see??   
Any challenges!?!?!


Friday, August 31, 2012

Sneak Peak!

The Anatomical Element Etsy store is now OPEN!!  Click here to see some awesome pieces! And snag them soon, the first sale was made in less than 1 hour after opening!!!!

Want custom pieces?  Email me your ideas and I will help make them come to life!!!


Monday, August 27, 2012

Milestones

Oh rats.  I have neglected this blog for far too long. When life gets busy, it's hard to update all avenues of social media equally.  Apparently, I'm extremely addicted to Facebook and thus that gets updated far more than this blog or my feeble little Twitter account. 

However, things are a-changin'!  New opportunities on the horizon and fun events planned!  I've hit a health and fitness milestone in my life and hopefully starting up a new business venture with it as well!  Also, my jewelry motivation is booming!  I am signed up for a new class, started my Etsy store and have been scanning art festivals for ideas and set up tips!!

So first, this health and fitness milestone.  One of my high school friends introduced me to a new health product a few months ago.  I was completely skeptical, because I was brought up knowing that healthy food and exercise will get you where you need to be.  Well, knowing and doing are two totally different things.  Being nearly at my heaviest weight, I decided to give it a try.  2 weeks later I was down 12 pounds and 9 inches.  :-)  It has completely changed my attitude, my outlook and my motivation!  I am signed up for a 15K in November and have now lost a total of 18 pounds! 
If anyone is interested, I would LOVE to share my experience with you and see if this product could change your life as well! It's insane how much better life is when you feel good about yourself!!

LW? Don't know who the artist is--would love to give credit.  Found it floating around facebook.  But it's very true. Sometimes we are our own worst enemies.   Attitude is everything in life. 


Secondly, my Etsy store!  I finally took the plunge and signed up!  It took a while to decide on a name (and who knows, that could change in time) but for now it's "Anatomical Element"  (because there are elements of anatomy in everything...)  I really want to pursue my anatomical jewelry ideas as well as other inspired creations.   Here's a sneak peek at the store. I haven't listed anything yet (need to finish them and take photos) But it will be up soon!

I also made up some quick business cards so when I sell something I can package it up all cute and include one!  I can't believe I've gone this long with out some sort of business card anyway!  
 

There just aren't enough hours in the day to do everything I have planned!  Check back soon and I'll share pictures of some of the anatomical pieces I've found at the art festivals around chicago!  I'm getting quite a little skull collection going!  :-) 

Tuesday, May 15, 2012

Concept to Creation

Just wanted to share one of my finished jewelry pieces. This was created for my mother-in-law as a mother's day gift.  Family is very important to her and family-themed jewelry has been floating around Pinterest and other sites lately, so I decided to create my own design.


Unfortunately I don't have any in-process photos (I need to get better at taking those...)  But I do have the initial concept and finished piece.  It's actually amazing how close it turned out!

 The names on the left are her children from oldest to youngest -- Derek, Travis, Hope.  The names on the right are her children's spouses -- Rachel, Tara, Mark.    The 3 pieces are separate (not soldered together) so they can move freely and add a little jingle to the pendant.  It is made of brass and silver with a silver bezel set jasper stone.

Whatcha think???   

Sunday, May 6, 2012

Stones, Gems, Cabochons!

I'm sitting here listening to the birds chirp in between the quiet thunder.  So relaxing and inspirational!  Something about interesting weather that gets the creativity flowing. :-)

Anyhoo, I wanted to share the final products of my resin experiment.  I learned that you can't stir the mixture too quickly or you will get air bubbles.  Well crap, but for a first try I think they were successful.  A few took longer than 24 hours to dry, but overall not too shabby.

I made a few others in heart shapes that I didn't want to keep, so I gave them to a friend in jewelry class for her daughter.  These are probably more than I will use anyway since my class is ending in a month and I have way too many new ideas. 
 
 The medical illustrator in me just HAD to make an eyeball with the clear resin!  I couldn't resist!  So technically I did not do this correctly since the eyeball image is not embedded in the resin....i printed it later and placed it behind the resin, but it will work.  I plan to make it into a simple ring.   Not quite as realistic as the acrylic eye I made in anaplastology class!

I am also trying to finish up a mother's day pendant for my mom. She picked out the stone the last time she visited Chicago, and I unfortunately can't remember what it is!  But I wanted to create a unique design for her and try something new. So I took silver wire and used it as a border around the hand-forged copper as well as used it for connections to the chain.  I still have to set the stone and will hopefully finish this next week.


Also, yesterday a jewelry classmate and I hopped on the CTA and ventured to Rosemont for the International Gem and Jewelry Show.  It was a massive display of beads, gems, stones, findings, wire--a beginning jeweler's dream!! Nearly overwhelming, but luckily I came with a budget!  I wasn't really sure what I was looking for, but if something spoke to me, then it went home with me :-)

 These were in the $1 bins and I was super excited!  I can make rings or pendants out of them! I've noticed that I am drawn to earthy and organic cabochons rather than sparkly ones.  I did choose one (the purple one at the top) that is more like a crystal, just for variety.

 These are my FAVORITE!  The greenish ones are Red Creek Jasper but the other one is unknown.  I just LOVE them!! I think I will make earrings and a matching ring from the Red Creek Jasper and perhaps a pendant from the other one.  Copper looks good with both of them, but I might use silver on the orange/white one to make it stand out more. 

So many new projects to finish before class is over!  Time to get into the open studio at night and on weekends!  This is my sanity's saving grace since I am working overtime for work as well.  And as I said before, rainy days are PERFECT for productivity and creativity!! 

Sunday, April 29, 2012

Resin Virgin!

So today I experimented with a new medium: RESIN!  I am hoping to create some decent cabochons to use for jewelry, but today was just a play day.  It started out with difficulty getting the freaking can open and from there was just a mess...but hopefully a productive mess.  :-) 


I purchased Castin' Craft Resin and its catalyst components and played around with coloring options that I already had like nail polish and eyeshadow.  I will probably bring out the oil paints for a more opaque look next time.  I can also embed objects in the resin, so I am sketching up some fun drawings (probably anatomical) to include behind the resin.  I am super excited about those!!

This website has been extremely helpful explaining step-by-step how to use resin.  http://www.inspiri-art-and-craft.com/resin-jewelry.html


So for now the finished products are curing in front of a window for added ventilation.  I am extremely impatient and it's tough to wait 24 hours for them to completely dry!  I've already poked at them a couple times....lol! 


The ideas are endless!!  I can't wait to be able to use this medium for my jewelry!  I'm starting to make a "Creative To-Do List" because I have so many different ideas and projects that i want to try out and learn!  So far here's my start:
  1. Resin casting for jewelry
  2. Metal clay for jewelry
  3. Etching for jewelry
  4. Triptych painting on found alley wooden materials
  5. Polymer clay sculpting (possible bobblehead creation)
  6. T-shirt quilt (leftover project)
  7. Altered book (hopefully continuing the round robin)
  8. Mini-Bowling Pin paintings (actual christmas project)
What's on your list?

Sunday, April 15, 2012

Remembering grad school anatomy class

I was cleaning up stuff on the interwebs and ran across an old blog post from graduate school. As much as anatomy was a difficult and demanding class, once I figured out how to study and memorize it all, I actually really enjoyed it! Here's the post, hope you get a few laughs out of it!

"Anatomy Randomness"
Posted on October 20, 2005:

- if our foramen ovale didn't close, we would have an atrial septal defect and your right atrium and ventricle would be huge.

- if your heart valves don't close all the way, you have a valvular insuffiency. if they won't completely open, you have a stenosis.

- the vagus nerve continues as the pelvic splanchnic nerve in the abdomen. it is preganglionic parasympathetic.

- the pericardiacophrenic vessels travel with the phrenic nerve along the anterior of the heart--who the hell names these things?

- the celiac trunk has too many fucking branches.

- the female vaginal muscles look wimpy.

- the spermatic cord consists of: ductus deferens, deferential artery, testicular artery, cremaster muscle, cremasteric artery, lymph vessels, pampiniform plexus of veins to keep the balls cool, and a testicular vein. I may have forgotten something....

- Ever think that you could get a loop of intestine in your nut sac? yep, it's called a hernial sac. but don't worry, that only happens if your testes don't descend properly. I'm sure you're fine.

- Hey ladies, gonna have children? get ready for your central tendon of your perineum to be cut to make your vagina bigger! Just let the episiotomist do his/her job, letting it tear would be worse.

Sunday, March 25, 2012

ShamROCK ON!

Another item crossed off my 30-Before-30 List! Today the hubs and I ran the Chicago Shamrock Shuffle 8k!
We didn't train very much so I was extremely excited to finish these 5 miles in less than 1 hour (58 minutes, cutting it close but still under!) And now I think he's caught the running bug and wants to sign up for more, possibly a 10k. I don't know if he'll ever get the itch to run a half-marathon, but we shall see.

In other news...
- I signed up for another jewelry class! I'm basically re-taking the same class to focus on my techniques. After this I will be able to take intermediate and specialty classes! Very excited!!

- We just got back from a fabulous spring break trip to Edisto Island, South Carolina. My family takes a trip south every year with my grandmother and we usually tag along. This year grandma was able to get out on the beach in a fun beach/moon buggy! The whole place was so peaceful and it was great to get away from technology and the craziness of the city for a while. I'll leave you with a few photos.

The gorgeous live oaks towering over the road. You can just feel the history here.

Botany Bay Beach. We found at least 6 perfect sand dollars. Amazing!

My 93 year old grandmother enjoying the beach!

Monday, March 12, 2012

What you missed while I was busy

Another long hiatus. I know, I know. Just means I'm busy.
So here's what you missed when I was busy*
(*I believe I unintentionally stole this title from TheBloggess without even realizing it. You can tell which blogs I read on a regular basis!)


1. Final wrap-up of the Guatemala trip.
On Day 5 we took a boat to the surrounding towns on Lake Atitlan. The first stop was Santiago where we saw the Saint of Debauchery! The Saint is located in someone's home and it's a way for the family to make money. We had to walk up incredibly steep streets to get to this place, but it was pretty awesome!

We walked around the shoppes in Santiago and soon headed back to the boat to cross the lake for San Marcos. This town was much smaller and really didn't have any focal point besides a great view of the volcanoes!
Unfortunately on this day we were all feeling the effects of the food we had eaten after our mountain trek. We ate a cold salad that was prepared with local water. Big no-no. So we took this opportunity to head back to the hostel and lounge around.

The next day we headed back to Panajachel by boat, then boarded the 2 hour shuttle bus back to Guatemala City. Flights the next morning went without hiccup and I was back in the states for Christmas Eve with my family! Amazing trip and now I fear I have caught the traveling bug...I must do it again soon! :-)

@ San Marcos before heading back to our hostel in San Pedro to relax.

2. Second jewelry class at LillStreet:
In January I started my second jewelry class. It is still a beginning jewelry class but it was 10 weeks instead of 5, so we reviewed the basics and then learned bezel stone settings! I have purchased a few of the tools so I can create jewelry with cold connections at home, but haven't made the jump into the soldering tools yet.

My little jewelry studio (aka the corner of our bedroom)

I am hoping to sell some of my designs, possibly setting up an Etsy store since they have a large community already. I really want to design anatomical jewelry and I have a couple examples, but the possibilities are endless! I will post more (and better pictures) soon once I completely finish these pieces and the class.

My skull pendant and my first attempt at bezel setting!

I will update soon with more jewelry / art ideas and products! I need to decide a store name (for Etsy). any ideas??

Thursday, January 19, 2012

Guatemala Day 4: San Pedro & The Mayan Face

On Day 4 we packed up our gear and went down to the lake to get on a public boat to cross Lake Atitlan. Our destination was the town of San Pedro la Laguna and we had a date with a mountain!! After some heckling we finally gave in and paid the price for a private boat to get us there more quickly.
View of one of the many boat docks in Panajachel and Volcano Atitlan in the distance. Took about 20-30 minutes to cross the lake.

When we arrived in San Pedro, we walked around and luckily found our hostel (Zoola) very quickly. We got our rooms, changed and were off to climb our mountain!

We found our hiking guide in San Pedro and most groups take a shuttle, tuk-tuk or bus up to the starting point on the mountain....but oh, no not us. We somehow agreed to walk the entire way there. This added 2.5-3 extra miles to our hike. (We felt it later...)

We walked to our guide's building, which was on the edge of San Pedro where he grabbed his machete and gear. We also snapped one of our first pictures of our beautiful mountain. It's called Indian's Nose (or the more politically correct version- The Mayan Face) because it looks like a face laying on its side. The highest point being the tip of the nose.


Our guide was amazing and very informative. He stopped along the way and showed us the coffee beans that were drying. Poor Rob had to translate a lot of this for me since I was the weakest link with my Spanish. :-)

We took the back roads from San Pedro to San Juan, another small town on Lake Atitlan. Here we are looking back on San Pedro. Beautiful view.

Here's another picture of the mountain a little bit closer. We didn't scale the front, which would have been horribly difficult. We came in from the left side of this picture, hiked the flat portion, then up the forehead and nose.

And here is a photo of the face from the start of that flat part. Doesn't look so bad from here.

Photo from the start of the flat part, overlooking Lake Atitlan. Our guide was funny. He had a daughter named Raquel and so he and I became buddies. Since I was the only person in our group who had never been to a higher altitude, this hike was really rough for me. I was in shape, but not acclimatized. Everytime I would breathe, it was like I was only getting half a breath. So I was huffing and puffing like a fat kid in gym class all the way up. Our guide used his machete and made us walking sticks! Saved. my. life. :-)

Almost there! View of Volcano Atitlan from the forehead of the mountain. From here on out, this climb was brutal.

I called this the "Door to Heaven", because I felt like I was dying. The climb from the forehead to the nose was absolutely brutal for me, but so worth it!

Finally made it! What a view!

Kappa Alpha Theta!

We stayed at the top of the mountain for about 20 minutes, took lots of pictures, Kim nearly fell off (seriously, she did a jumping action shot and felt backwards a bit scaring the beejeezus out of everyone). We began our decent down the back of the mountain and into the town of Santa Clara. It was much smaller and had some killer steep roads that my legs were not happy about.
By this time we were absolutely starving so our guide took us to his favorite comedor for food. We had chicken, rice, tortillas and a cold salad that none of us should have eaten....but it all tasted so delicious!

Walking all the way back to San Pedro would have been insane, so we thought we were going to take a shuttle. When our guide told us to follow him onto a chicken bus packed to the gills with people, we were shocked! First chicken bus experience for KyleAnne too! It wasn't that bad, but none of us would have gotten on there without the guide.


Back in San Pedro we bee-lined to our hostel and immediately grabbed a drink and relaxed by the pool with a gorgeous view of Lake Atitlan. I think we were all asleep by 9:00pm.


Next post: Day 5 & 6: Santiago, San Marcos and back home